MapVThree 地图组件
刀刀
0字
0分钟
2026/8/16
MapVThree 简介
MapVThree 是百度地图官方的三维可视化库,用于在百度地图上实现三维数据可视化。官方文档:Mapvthree 开发文档
由于地图方法在每个图层都要使用,因此需要统一封装成公共方法,通过传值的形式设置不同的属性。
技术架构图
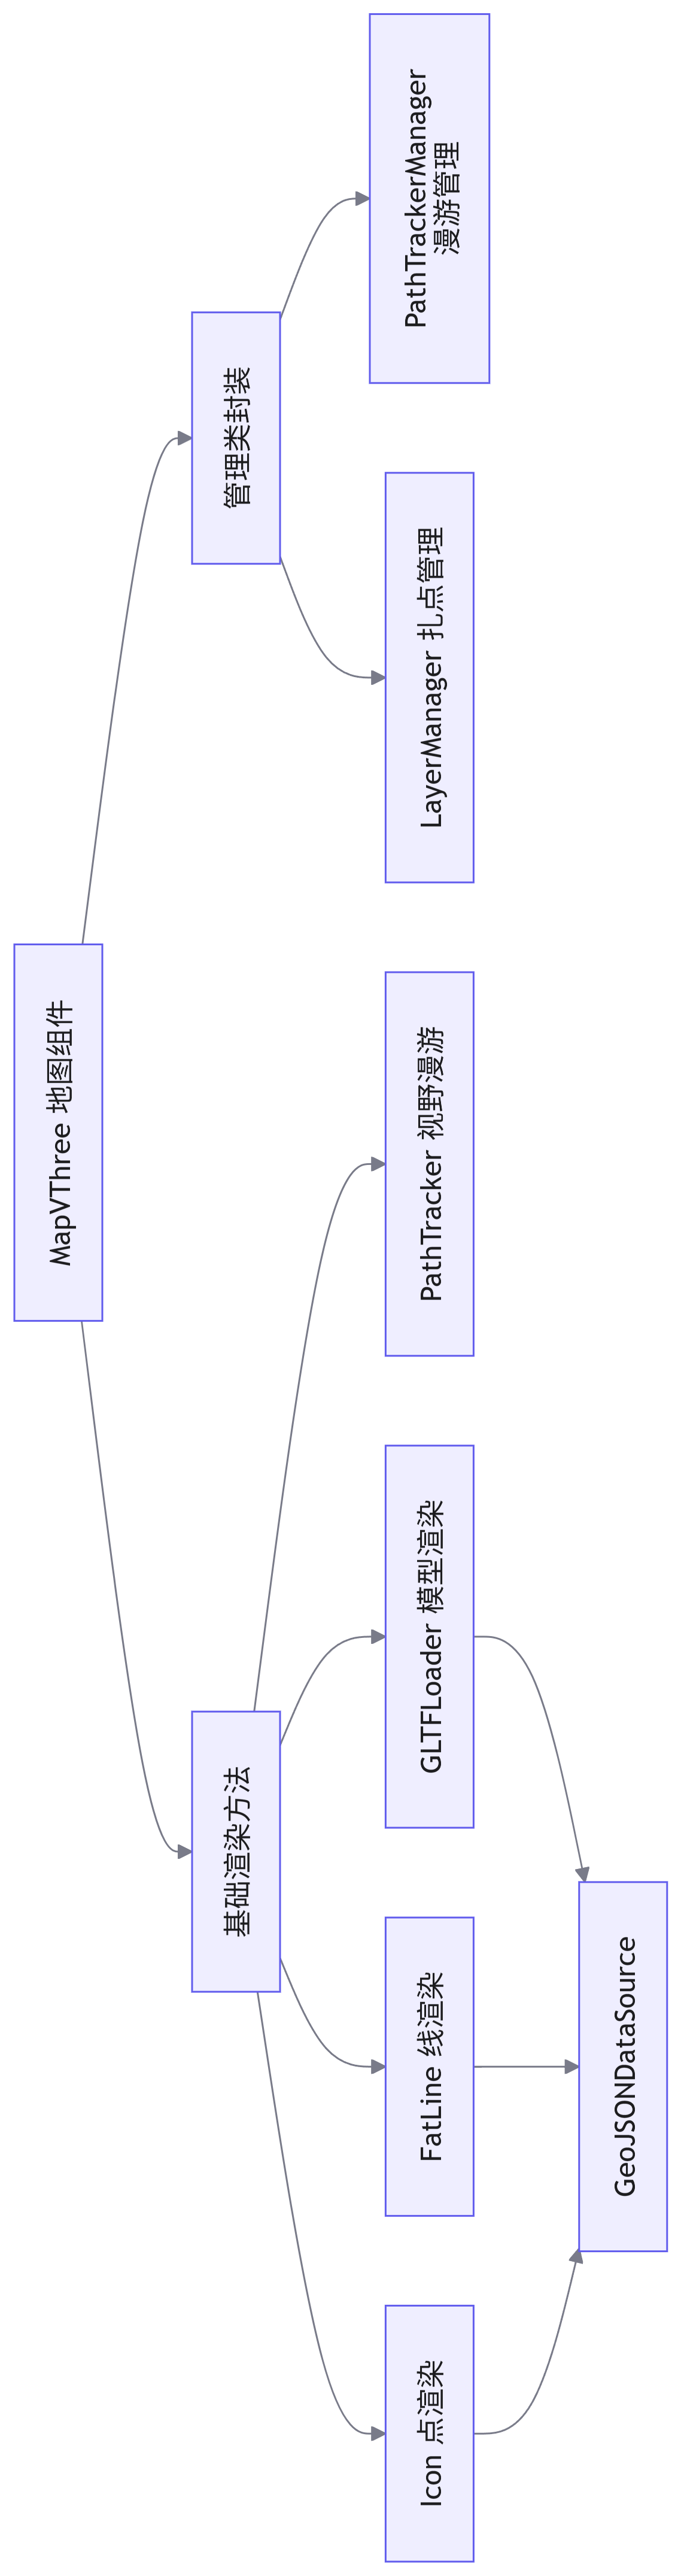
地图方法封装
点的封装
实现原理
根据官方文档,渲染点需要完成以下步骤:
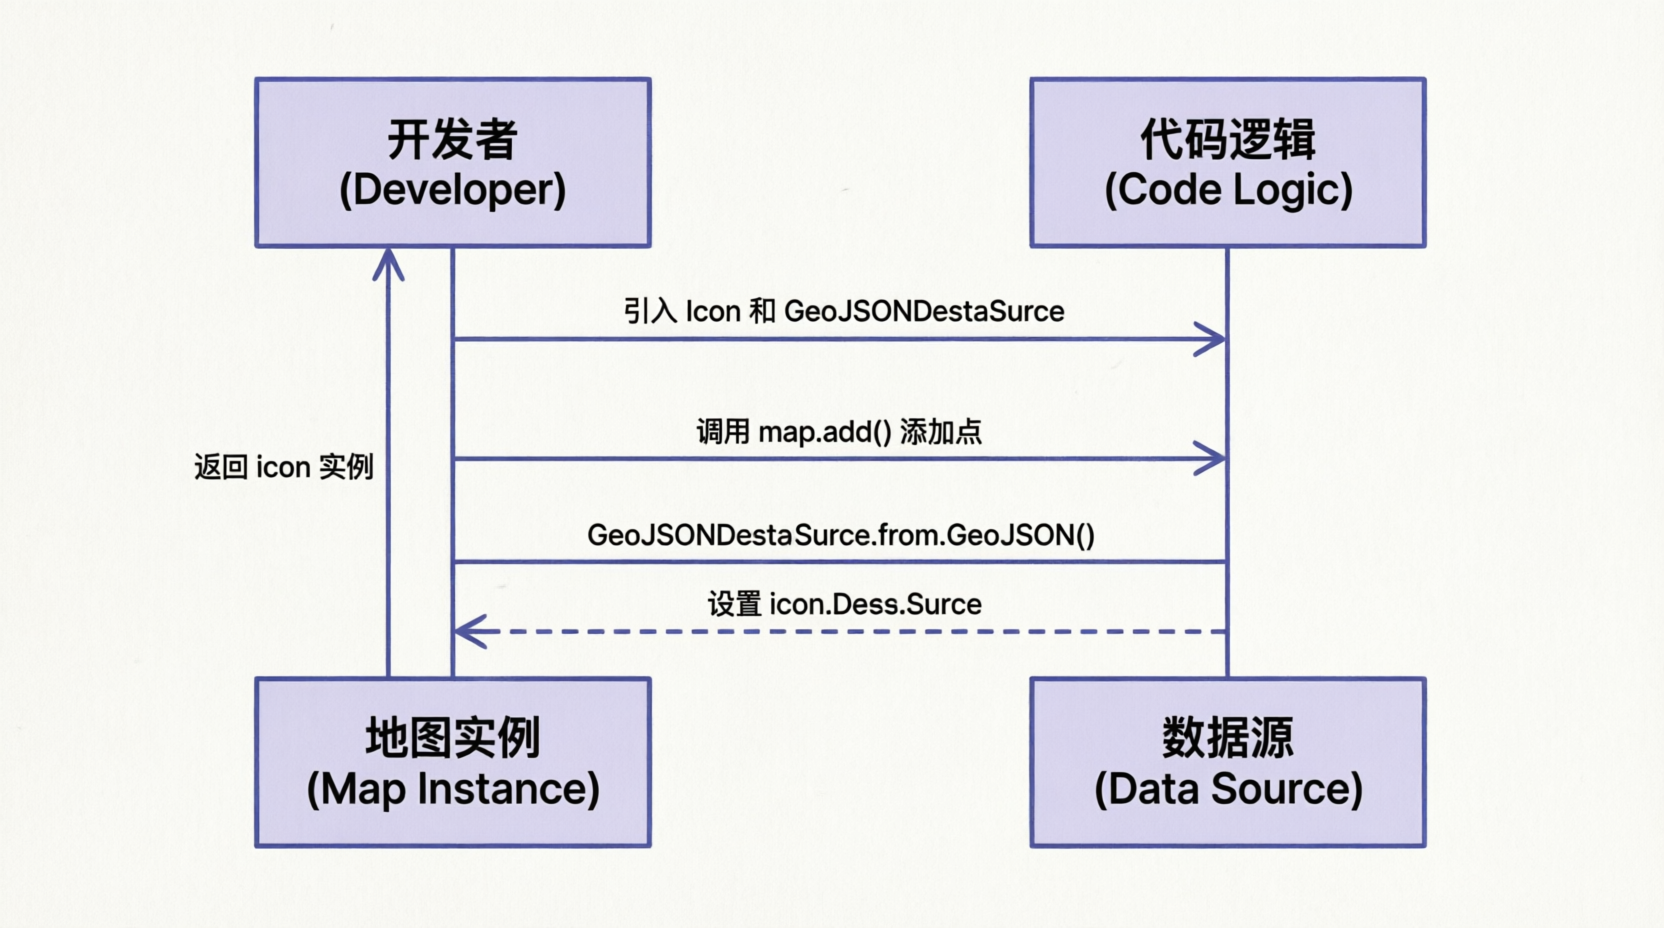
核心步骤
引入必要方法
Icon:用于创建点标记GeoJSONDataSource:将数据转换为渲染所需的数据源
添加点到地图
- 调用地图实例的
add()方法 - 传参:宽度、高度、偏移量等
- 调用地图实例的
获取数据源
- 调用
GeoJSONDataSource方法 - 入参可通过 F12 打开网络控制台查看
- 调用
删除点
- 调用地图实例的
remove()方法
- 调用地图实例的
数据结构示例
javascript
// GeoJSON 数据结构
const geoData = [
  {
    type: 'Feature',
    geometry: {
      type: 'Point',
      coordinates: [lng, lat, altitude], // 坐标
    },
    properties: {
      icon: url, // 图标图片路径
      size: 40, // 尺寸大小
    },
  },
]代码实现
javascript
/**
 * 添加图标点
 * @param {Array} coordinates - 坐标数组 [lng, lat, altitude]
 * @param {String} url - 图标图片路径
 * @param {Object} info - 配置信息
 * @returns {Object} { icon, _engine }
 */
export const addIcon = (coordinates, url, info) => {
  // 确保坐标数组完整性
  coordinates = [coordinates?.[0], coordinates?.[1], coordinates?.[2] || 0]

  const {
    width = 92,
    height = 118,
    offset = [0, -50],
    geoData = [
      {
        type: 'Feature',
        geometry: {
          type: 'Point',
          coordinates: coordinates,
        },
        properties: {
          icon: url,
          size: 40,
        },
      },
    ],
    _engine = engine.value,
  } = info || {}

  // 创建 Icon 实例
  const icon = _engine.add(
    new Icon({
      width,
      height,
      vertexSizes: true,
      vertexIcons: true,
      transparent: true,
      offset,
      depthTest: false, // 深度检测
    }),
  )

  // 加载数据源
  GeoJSONDataSource.fromGeoJSON(geoData).then((data) => {
    data.setAttribute('size').setAttribute('icon')
    icon.dataSource = data
  })

  return {
    icon,
    _engine,
  }
}

/**
 * 删除图标点
 * @param {Object} icon - 图标实例
 * @param {Object} _engine - 地图引擎实例
 */
export const removeIcon = (icon, _engine = engine.value) => {
  icon && _engine.remove(icon)
}参数说明表
| 参数名 | 类型 | 默认值 | 说明 |
|---|---|---|---|
width | Number | 92 | 图标宽度(像素) |
height | Number | 118 | 图标高度(像素) |
offset | Array | [0, -50] | 偏移量 |
vertexSizes | Boolean | true | 顶点大小 |
vertexIcons | Boolean | true | 顶点图标 |
transparent | Boolean | true | 是否透明 |
depthTest | Boolean | false | 深度检测 |
线的封装
实现原理
渲染线的流程与点类似,但使用的是 FatLine 方法。

核心步骤
引入必要方法
FatLine:用于创建线GeoJSONDataSource:转换数据源
添加线到地图
- 调用地图实例的
add()方法 - 传参:线宽、线的颜色、线的坐标等
- 调用地图实例的
获取数据源
- 调用
GeoJSONDataSource方法
- 调用
删除线
- 调用地图实例的
remove()方法
- 调用地图实例的
代码实现
javascript
/**
 * 添加线
 * @param {Array} coordinates - 坐标二维数组
 * @param {Object} info - 配置信息
 * @param {Object} _engine - 地图引擎实例
 * @param {Function} callback - 回调函数
 * @returns {Object} { line, _engine }
 */
export const addLine = (coordinates, info, _engine, callback) => {
  if (!_engine) _engine = engine.value

  const { lineWidth, color, opacity } = info || {}

  // 创建 FatLine 实例
  const line = _engine.add(
    new FatLine({
      vertexColors: true,
      lineWidth,
      opacity,
      keepSize: true,
      lineJoin: 'round',
    }),
  )

  // 构建 GeoJSON 数据
  const geojson = {
    type: 'Feature',
    geometry: {
      type: 'LineString',
      coordinates,
    },
    properties: {
      color: color,
    },
  }

  // 加载数据源
  GeoJSONDataSource.fromGeoJSON(geojson).then((geoData) => {
    geoData.setAttribute('color')
    line.dataSource = geoData
    callback && callback(geojson)
  })

  return { line, _engine }
}

/**
 * 删除线
 * @param {Object} line - 线实例
 * @param {Object} _engine - 地图引擎实例
 */
export const removeLine = (line, _engine = engine.value) => {
  line && _engine.remove(line)
}配置参数
javascript
// 线的配置示例
const lineConfig = {
  lineWidth: 15, // 线宽
  color: '#d0a63c', // 线的颜色
  opacity: 1, // 透明度
  vertexColors: true, // 顶点颜色
  keepSize: true, // 保持大小
  lineJoin: 'round', // 线条连接方式
}模型的封装
实现原理
使用 GLTFLoader 加载三维模型,并通过地图实例添加到场景中。
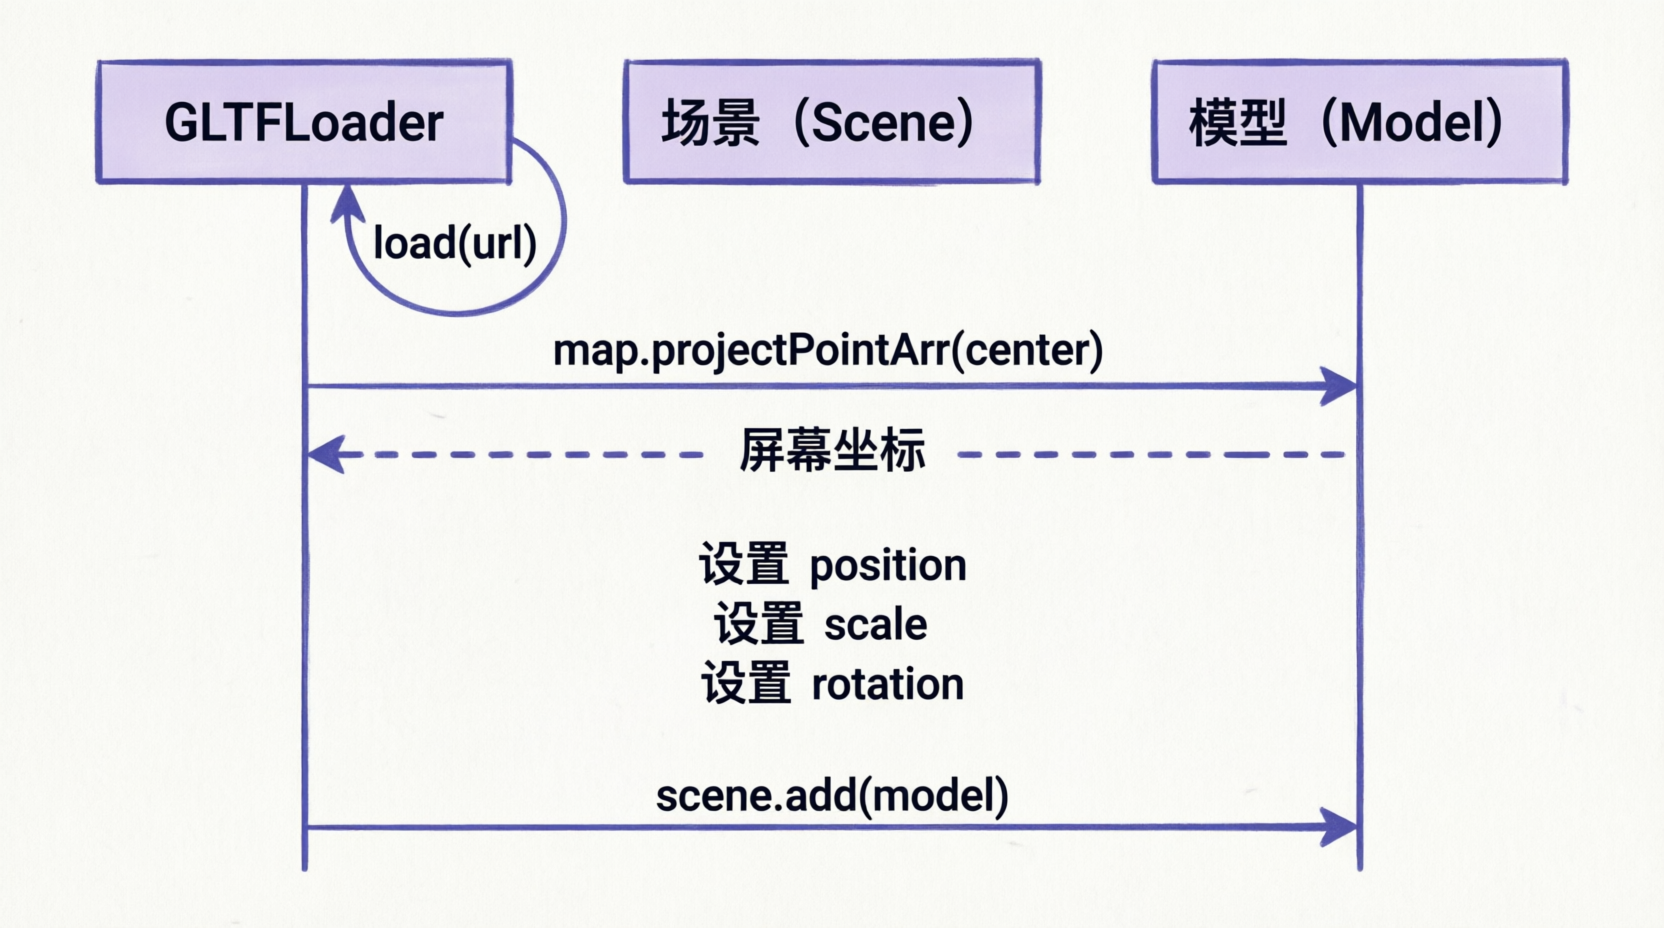
核心步骤
加载模型
- 使用
GLTFLoader进行模型加载
- 使用
添加到场景
- 通过地图实例的
add()方法添加到场景
- 通过地图实例的
设置位置
- 使用
map.projectPointArr(center)获取屏幕中心点坐标 - 设置模型的
position
- 使用
load 回调
- 获取模型数据
- 设置坐标和大小
删除模型
- 使用地图实例的
remove()方法移除
- 使用地图实例的
代码实现
javascript
/**
 * 添加模型
 * @param {String} url - 模型文件路径
 * @param {Array} position - 位置坐标 [lng, lat]
 * @param {Number} scale - 缩放比例
 * @param {Function} callback - 加载完成回调
 */
export const addModel = (
  url = 'maplayer/assets/models/car-impact.glb',
  position,
  scale = 7,
  callback,
) => {
  const loader = new GLTFLoader()

  // 将经纬度转换为屏幕坐标
  const point = engine.value.map.projectPointArr(position)

  let model = null

  loader.load(url, (gltf) => {
    model = gltf.scene

    // 设置模型位置
    model.position.set(point[0], point[1], 0)

    // 设置模型缩放
    model.scale.setScalar(scale)

    // 设置模型旋转(X轴旋转90度)
    model.rotation.x = Math.PI / 2

    // 添加到场景
    engine.value.add(model)

    callback && callback(model)
  })
}

/**
 * 删除模型
 * @param {Object} model - 模型实例
 */
export const removeModel = (model) => {
  model && engine.value.remove(model)
}模型变换说明
| 变换类型 | 方法 | 说明 |
|---|---|---|
| 位置 | model.position.set(x, y, z) | 设置模型在场景中的位置 |
| 缩放 | model.scale.setScalar(value) | 统一缩放模型 |
| 旋转 | model.rotation.x = Math.PI / 2 | 绕X轴旋转90度(GLTF模型通常需要) |
视野漫游动画封装
实现原理
使用 PathTracker 实现相机沿路径移动的动画效果。
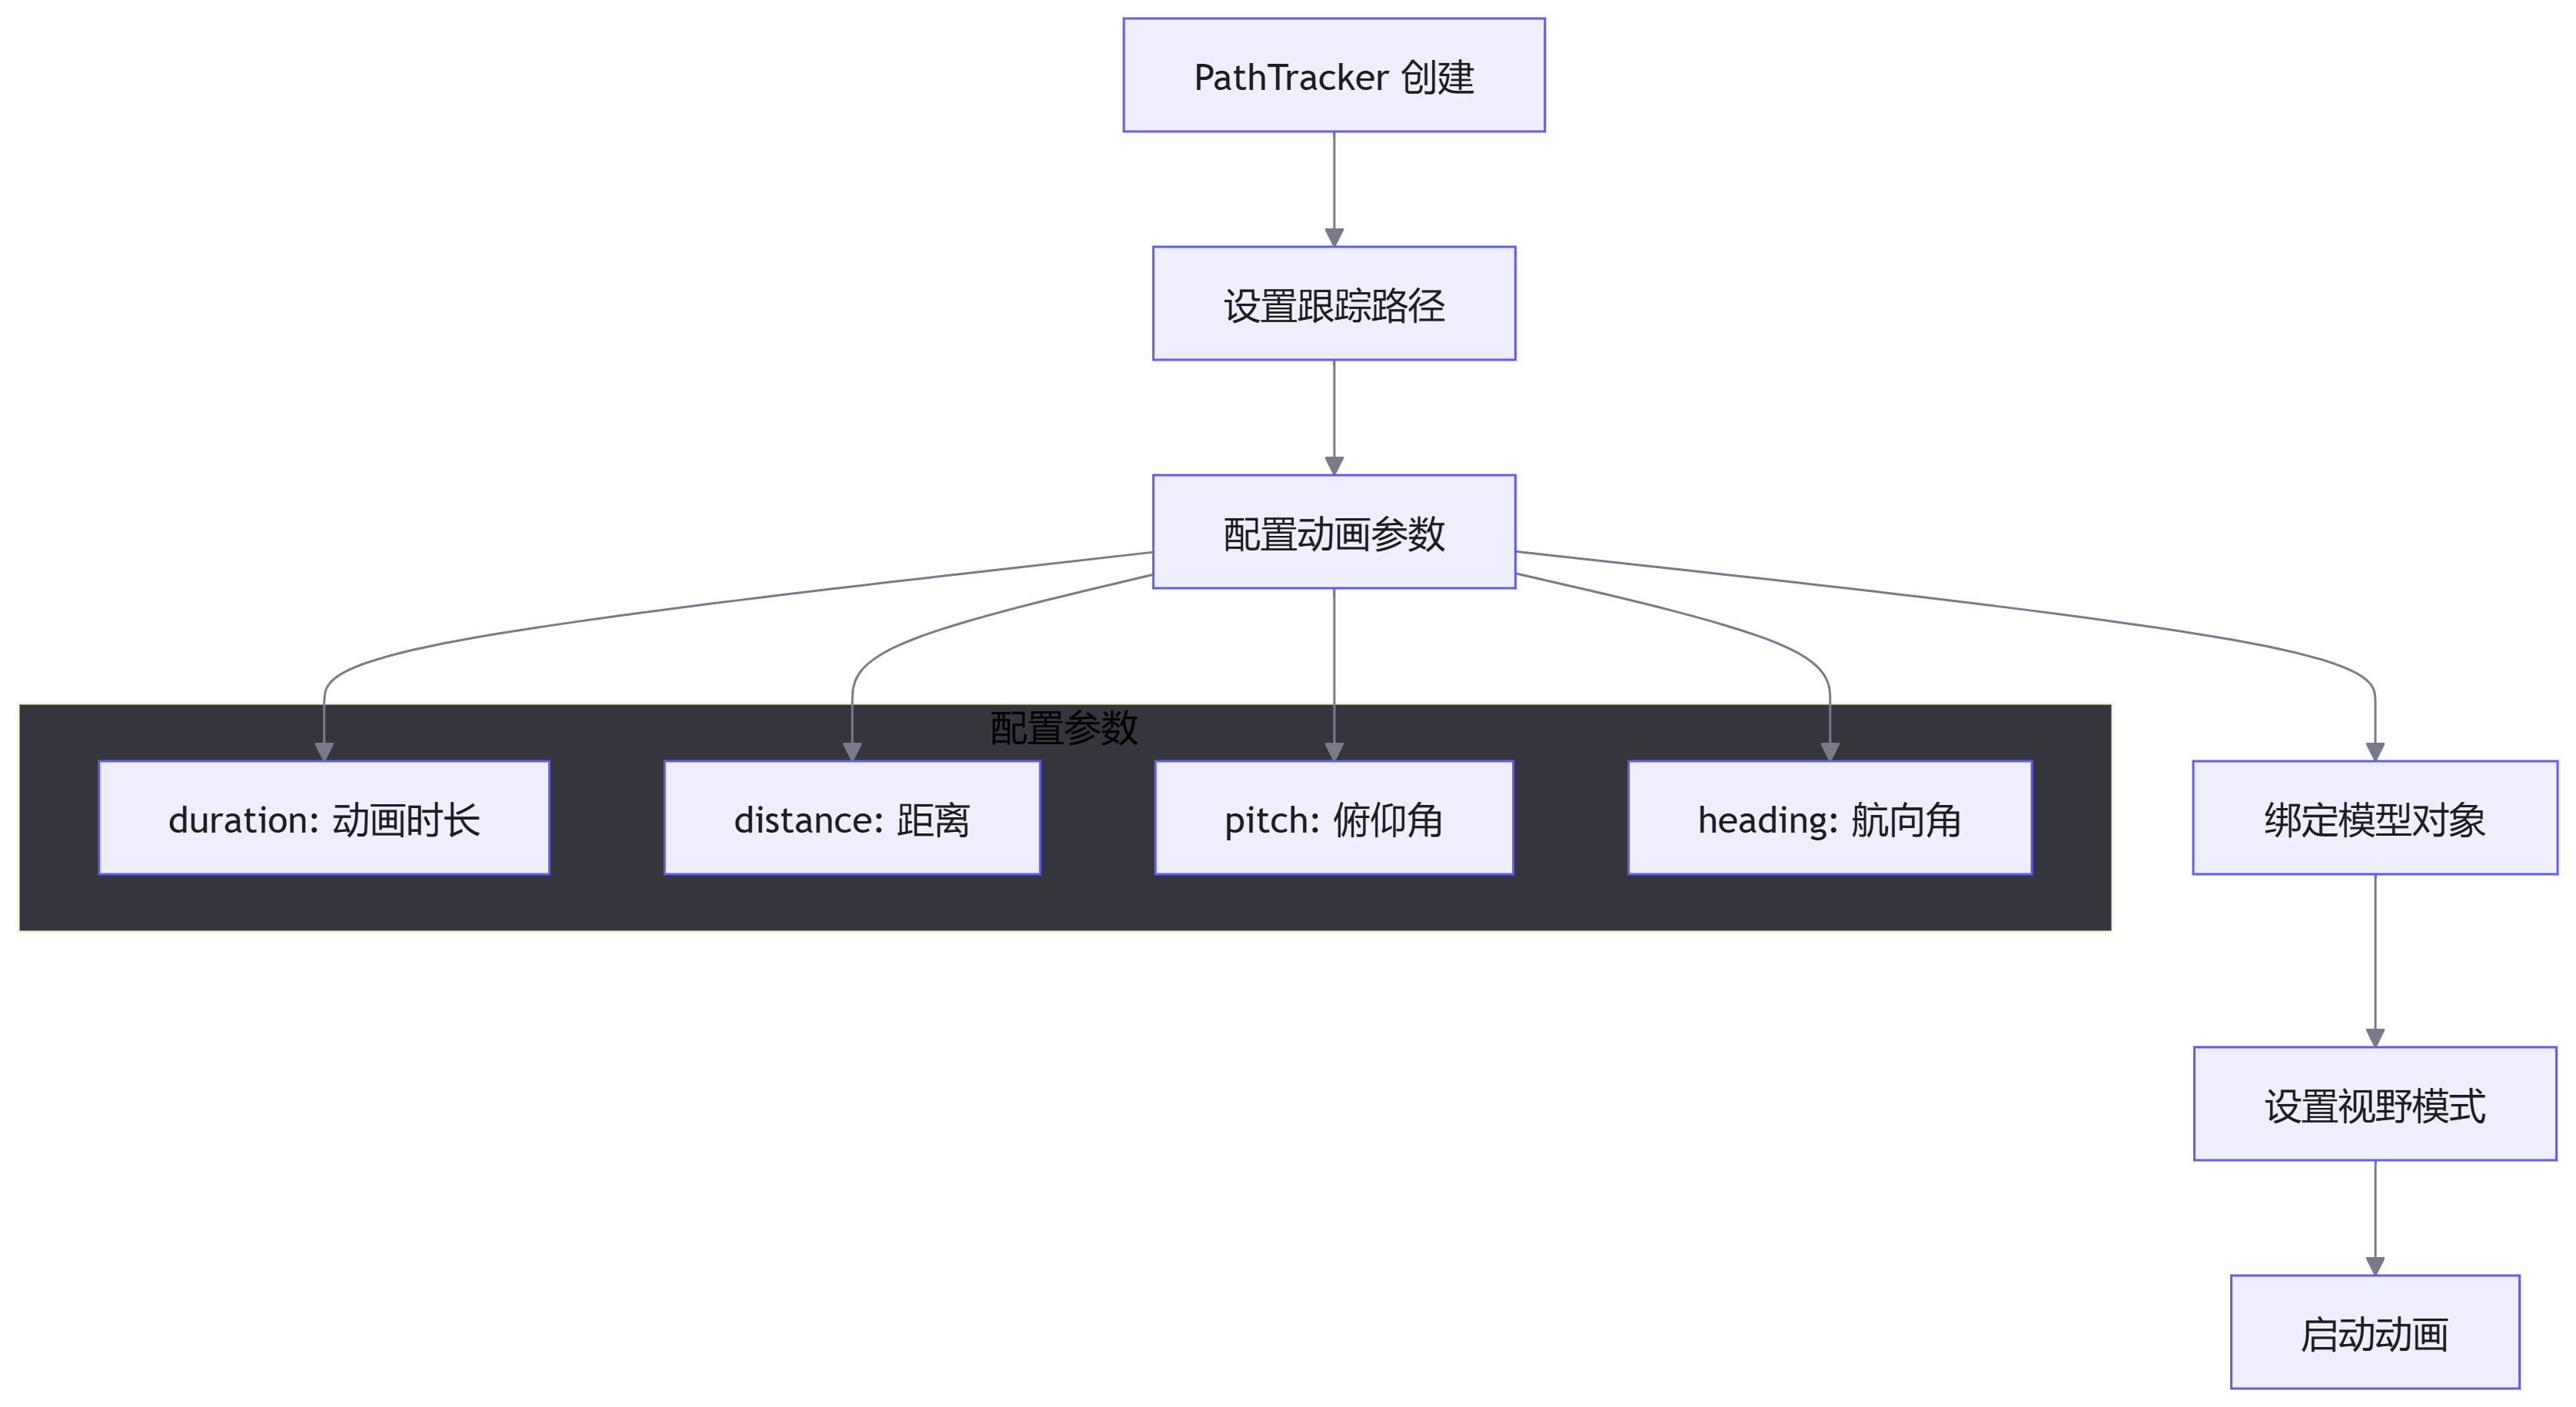
核心步骤
引入方法
PathTracker:实现视野漫游动画
添加到地图
- 调用地图实例的
add()方法
- 调用地图实例的
配置参数
- 设置方向插值的距离点阈值
- 赋值跟踪的路线和模型
- 设置视野漫游类型
- 开启动画
删除动画
- 调用地图实例的
remove()方法
- 调用地图实例的
代码实现
javascript
/**
 * 添加视野漫游动画
 * @param {Object} options - 配置选项
 * @returns {Object} { pathTracker, _engine }
 */
export const addPathTracker = (options) => {
  const {
    viewMode = 'unlock', // 视野模式
    positions, // 路径坐标数组
    model, // 跟踪的模型
    duration = 10000, // 动画时长(毫秒)
    distance = 50, // 距离
    pitch = 70, // 俯仰角
    _engine = engine.value,
  } = options

  // 创建 PathTracker 实例
  const pathTracker = _engine.add(new PathTracker())

  // 设置方向插值阈值
  pathTracker.interpolateDirectThreshold = 50

  // 设置跟踪路径(坐标数组或 LineString 类型的 geojson 数据)
  pathTracker.track = positions

  // 启动动画
  pathTracker.start({
    duration,
    distance,
    pitch,
    heading: 10,
  })

  // 绑定跟踪对象
  pathTracker.object = model

  // 设置视野模式
  pathTracker.viewMode = viewMode

  return {
    pathTracker,
    _engine,
  }
}

/**
 * 删除视野漫游动画
 * @param {Object} name - 动画实例
 * @param {Object} _engine - 地图引擎实例
 */
export const removePathTracker = (name, _engine = engine.value) => {
  name && _engine.remove(name)
}参数详解
| 参数名 | 类型 | 默认值 | 说明 |
|---|---|---|---|
viewMode | String | 'unlock' | 视野模式(unlock/follow) |
positions | Array | - | 路径坐标数组 |
model | Object | - | 跟踪的模型对象 |
duration | Number | 10000 | 动画时长(毫秒) |
distance | Number | 50 | 相机与模型的距离 |
pitch | Number | 70 | 相机俯仰角 |
heading | Number | 10 | 相机航向角 |
interpolateDirectThreshold | Number | 50 | 方向插值距离阈值 |
地图方法使用
封装策略
直接使用函数调用虽然可行,但存在以下问题:
- 无法直观知道当前渲染的地图数据来源和名称
- 无法轻松删除对应位置的地图数据
- 缺乏统一的管理机制
**解决方案:**封装管理类
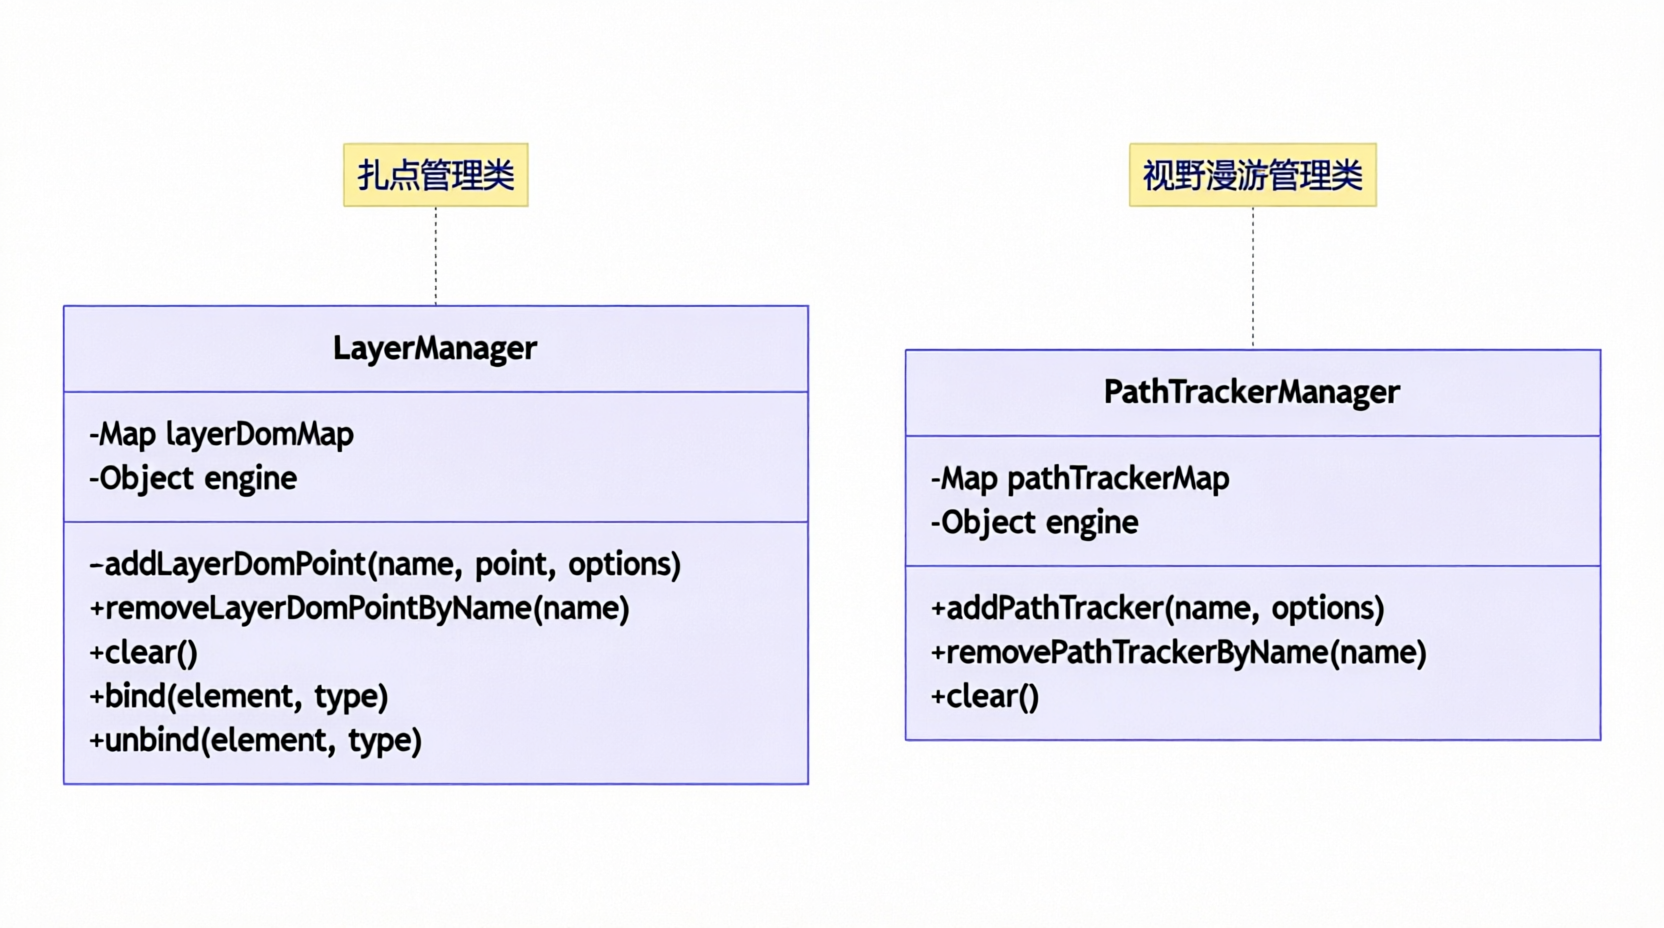
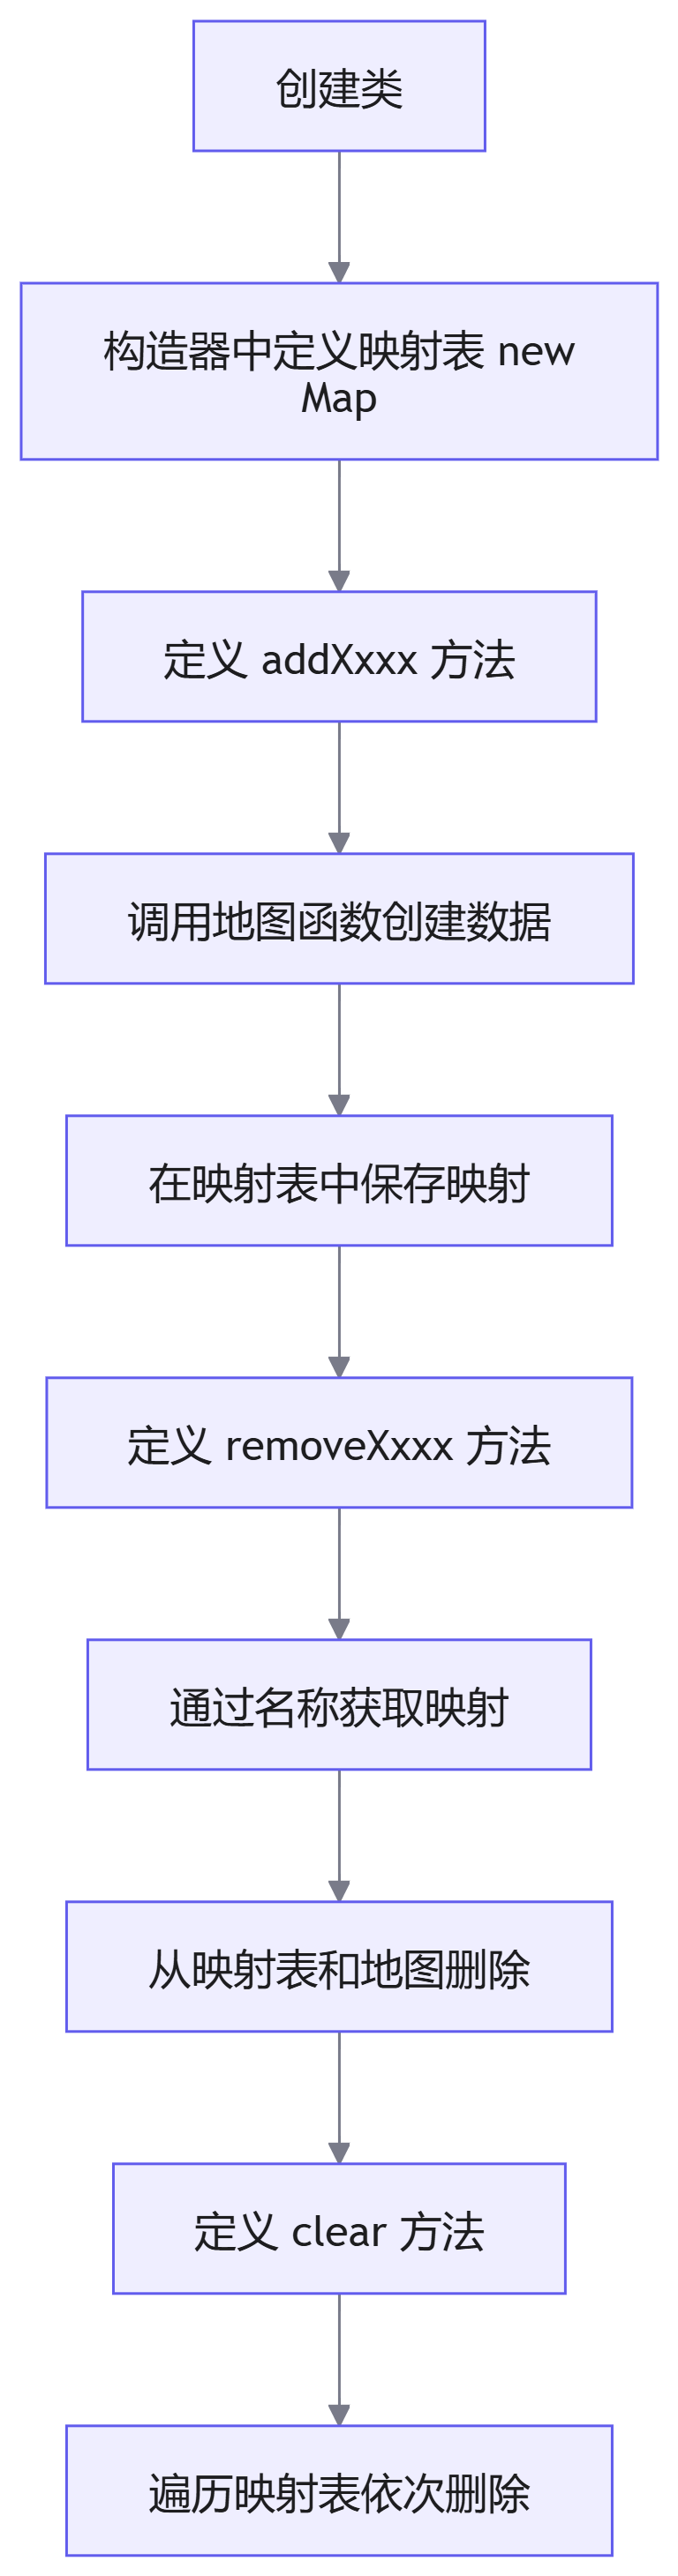
管理类封装步骤
扎点组件
需求分析
根据 UI 图,扎点效果包含三个部分:
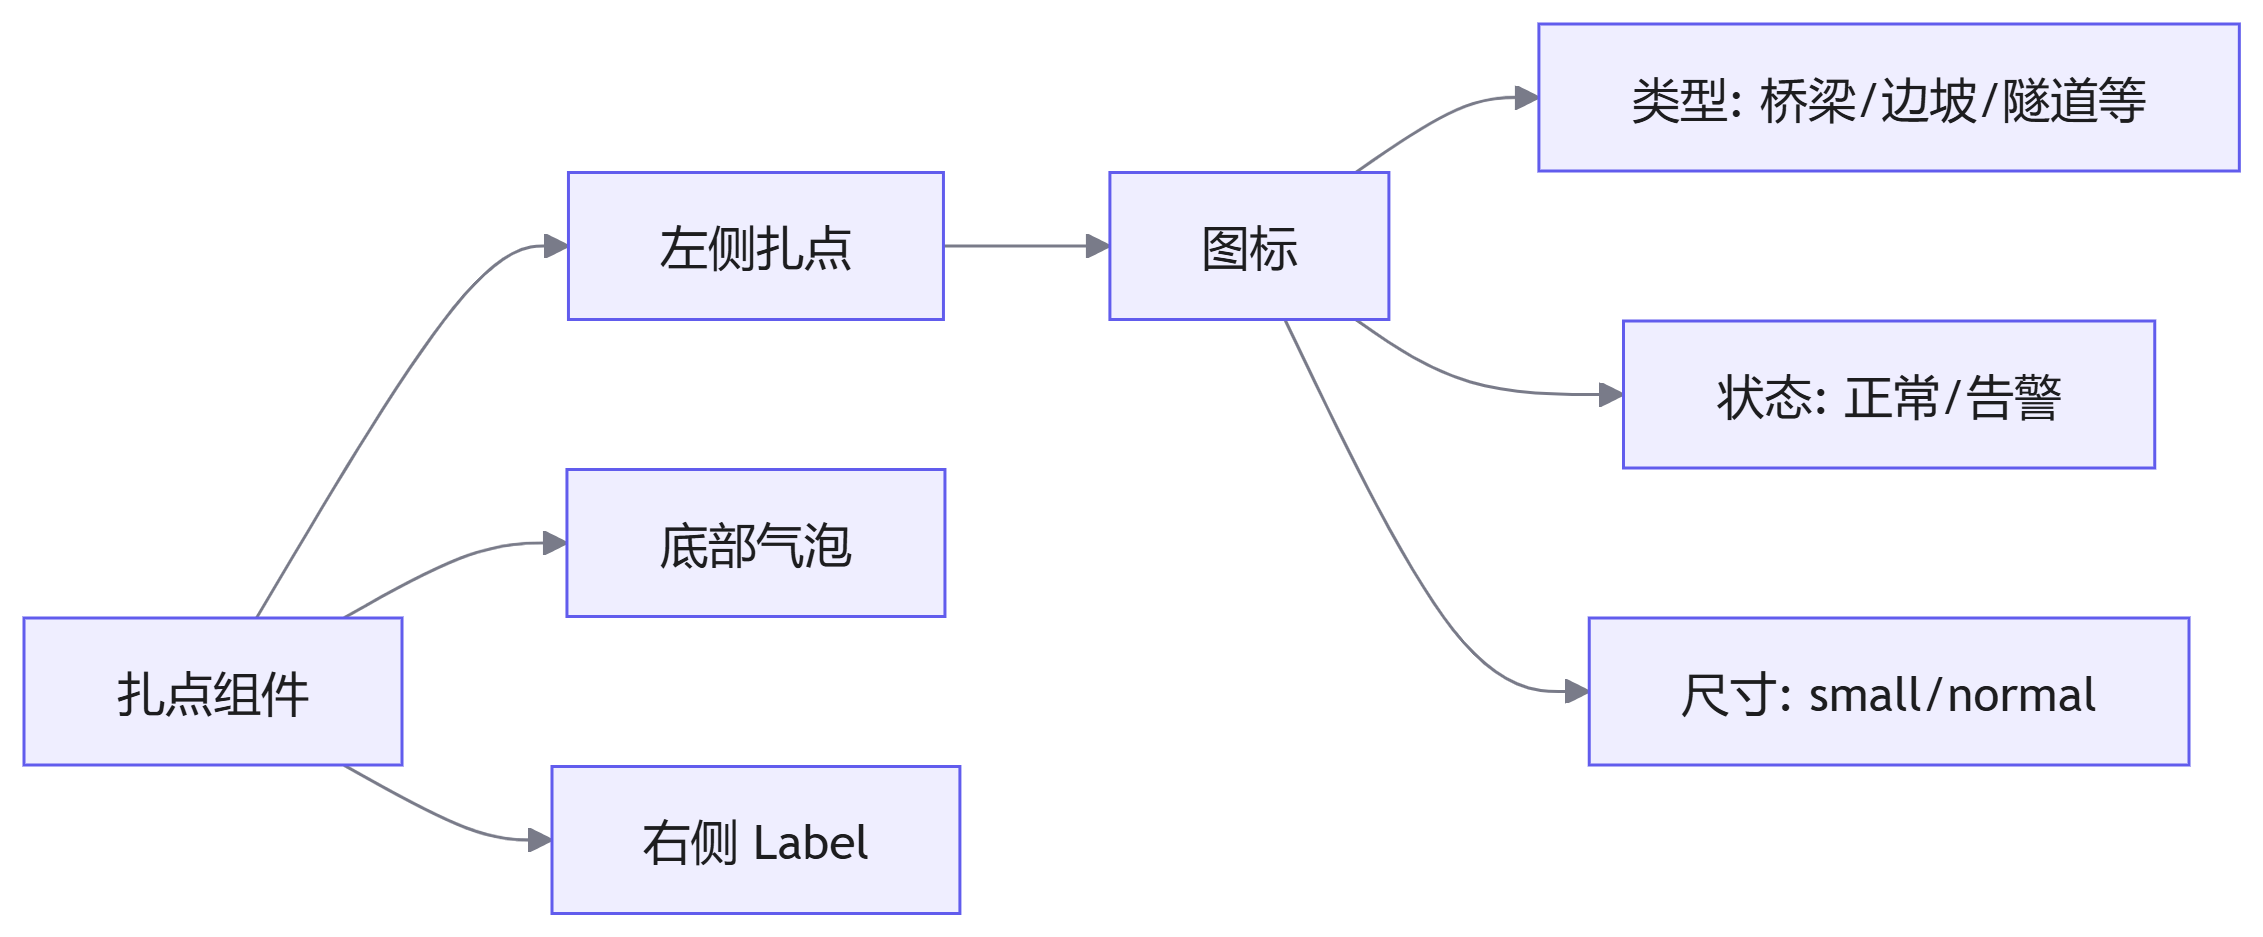
扎点类型说明
扎点具有多种维度的区别:
| 维度 | 类型 | 说明 |
|---|---|---|
| 扎点类型 | 桥梁、隧道、路面等 | 不同的结构物类型 |
| 扎点状态 | 正常、告警病害等 | 不同的业务状态 |
| 扎点尺寸 | 小尺寸、中尺寸、大尺寸 | 不同的显示大小 |
图片资源管理
命名规范:扎点类型_扎点大小_扎点状态
javascript
// 命名示例
// qiaoliang_normal_normal.png   - 桥梁_正常尺寸_正常状态
// bianpo_small_red.png          - 边坡_小尺寸_告警状态
// suidao_normal_warning.png - 隧道_正常尺寸_警告状态类型映射表:
javascript
// 对象映射表:扎点类型中文转拼音
const nameMap = {
  桥梁: 'qiaoliang',
  边坡: 'bianpo',
  隧道: 'suidao',
  路面: 'lumiàn',
  // ... 更多类型
}偏移量计算
javascript
/**
 * 计算 label 的偏移量
 * @param {HTMLElement} labelDom - label DOM 元素
 * @param {String} size - 尺寸大小
 * @returns {Array} [offsetLeft, offsetTop]
 */
const getLabelOffset = (labelDom, size) => {
  if (!labelDom) {
    return [0, 0]
  }

  const { width, height } = labelDom.getBoundingClientRect()

  // 图标尺寸配置
  const iconWidth = size === 'normal' ? 48 : 32
  const iconHeight = size === 'normal' ? 83 : 55

  // 间距配置
  const gapLeft = size === 'normal' ? 10 : 5
  const gapTop = size === 'normal' ? 42 : 28

  // 计算偏移量
  const offsetLeft = width / 2 + iconWidth / 2 + gapLeft
  const offsetTop = -(height / 2 - (iconWidth + gapTop) / 2) - iconHeight

  return [offsetLeft, offsetTop]
}图片路径生成
javascript
/**
 * 获取 icon 图片路径
 * @param {String} type - 扎点类型
 * @param {String} size - 尺寸大小
 * @param {String} status - 状态
 * @param {String} iconUrl - 自定义图标路径
 * @returns {String} 图片路径
 */
const getIconUrl = (type, size = 'normal', status = 'normal', iconUrl) => {
  // 如果有自定义图标,直接使用
  if (iconUrl) {
    return iconUrl
  }

  // 状态处理
  const getIconStatus = (status) => {
    return `_${status}`
  }

  // 尺寸处理
  size = size === 'normal' ? '_normal' : '_small'

  // 状态处理
  status = getIconStatus(status)

  // 类型转换(中文转拼音)
  type = nameMap[type] || type

  // 返回完整路径
  return `maplayer/assets/image/${type}${size}${status}.png`
}事件绑定
javascript
// 支持绑定的事件映射
const eventNameEnum = {
  click: 'clickCallback',
  mouseenter: 'onMouseenter',
  mouseleave: 'onMouseleave',
}

/**
 * 绑定事件
 * @param {Object} element - 地图元素
 * @param {String} type - 事件类型
 */
bind(element, type) {
  const addEventListener = (type) => {
    const eventName = eventNameEnum[type]
    const callback = this.options[eventName]

    if (callback && typeof callback === 'function') {
      element.receiveRaycast = true
      element[type] = callback
      element.engine.event.bind(element, type, callback)
    }
  }

  if (type) {
    addEventListener(type)
    return
  }

  // 绑定所有事件
  Object.keys(eventNameEnum).forEach((eventType) => {
    addEventListener(eventType)
  })
}

/**
 * 移除事件
 * @param {Object} element - 地图元素
 * @param {String} type - 事件类型
 */
unbind(element, type) {
  const removeEventListener = (type) => {
    element.engine.event.unbind(element, type, element[type])
    element[type] = null
  }

  if (type) {
    removeEventListener(type)
    return
  }

  // 移除所有事件
  Object.keys(eventNameEnum).forEach((eventType) => {
    removeEventListener(eventType)
  })
}LayerManager 完整实现
js
import {
  addBubble,
  removeBubble,
  addIcon,
  removeIcon,
  addDOMOverlay,
  removeDOMOverlay,
} from '../xxx.js'

/**
 * 扎点管理类
 */
class LayerManager {
  constructor(engine) {
    this.layerDomMap = new Map()
    this.engine = engine
    this.options = {}
  }

  /**
   * 添加扎点
   * @param {String} name - 扎点名称(唯一标识)
   * @param {Array} point - 坐标 [lng, lat]
   * @param {Object} options - 配置选项
   */
  addLayerDomPoint(name, point, options) {
    // 如果已存在,先删除
    if (this.layerDomMap.has(name)) {
      this.removeLayerDomPointByName(name)
    }

    this.options = options

    const {
      labelDom,
      type = '桥梁',
      iconUrl,
      customData,
      bubbleColor,
      clickCallback,
      size = 'normal',
      status = 'normal',
    } = options || {}

    // 1. 创建气泡点
    let { bubble } = addBubble(point, {
      size: size === 'normal' ? 60 : 40,
      color: bubbleColor,
      type: 'Wave',
      _engine: this.engine,
    })

    // 2. 创建右侧 label DOM
    let { domOverlay } = addDOMOverlay(point, labelDom, {
      _engine: this.engine,
      offset: getLabelOffset(labelDom, size),
    })

    // 3. 创建图标
    let { icon, _engine } = addIcon(
      point,
      getIconUrl(type, size, status, iconUrl),
      {
        width: size === 'normal' ? 48 : 32,
        height: size === 'normal' ? 83 : 55,
        offset: size === 'normal' ? [0, -42] : [0, -28],
        customData,
        _engine: this.engine,
      },
    )

    // 4. 绑定事件
    this.bind(options, icon)

    // 5. 保存到映射表
    this.layerDomMap.set(name, {
      Bubble: bubble, // 气泡点
      Label: domOverlay, // 文字 label
      Icon: icon, // 图标
    })
  }

  /**
   * 根据名称删除扎点
   * @param {String} name - 扎点名称
   */
  removeLayerDomPointByName(name) {
    const warning = this.layerDomMap.get(name)
    if (!warning) return

    // 解绑事件
    this.unbind(warning.Icon)

    // 删除各个元素
    Object.keys(warning).forEach((key) => {
      const remove = removeMap[key]
      remove(warning[key], this.engine)
    })

    // 从映射表删除
    this.layerDomMap.delete(name)
  }

  /**
   * 清空所有扎点
   */
  clear() {
    ;[...this.layerDomMap.keys()].forEach((macro) => {
      this.removeLayerDomPointByName(macro)
    })
    this.layerDomMap.clear()
  }
}

export { LayerManager }使用示例
js
// 1. 创建管理器实例
const layerManager = new LayerManager(engine.value)

// 2. 添加扎点
layerManager.addLayerDomPoint('point-1', [116.404, 39.915], {
  type: '桥梁',
  size: 'normal',
  status: 'normal',
  bubbleColor: '#00ff00',
  labelDom: document.getElementById('label-1'),
  clickCallback: () => {
    console.log('点击了扎点')
  },
  onMouseenter: () => {
    console.log('鼠标移入')
  },
  onMouseleave: () => {
    console.log('鼠标移出')
  },
})

// 3. 删除指定扎点
layerManager.removeLayerDomPointByName('point-1')

// 4. 清空所有扎点
layerManager.clear()视野漫游动画组件
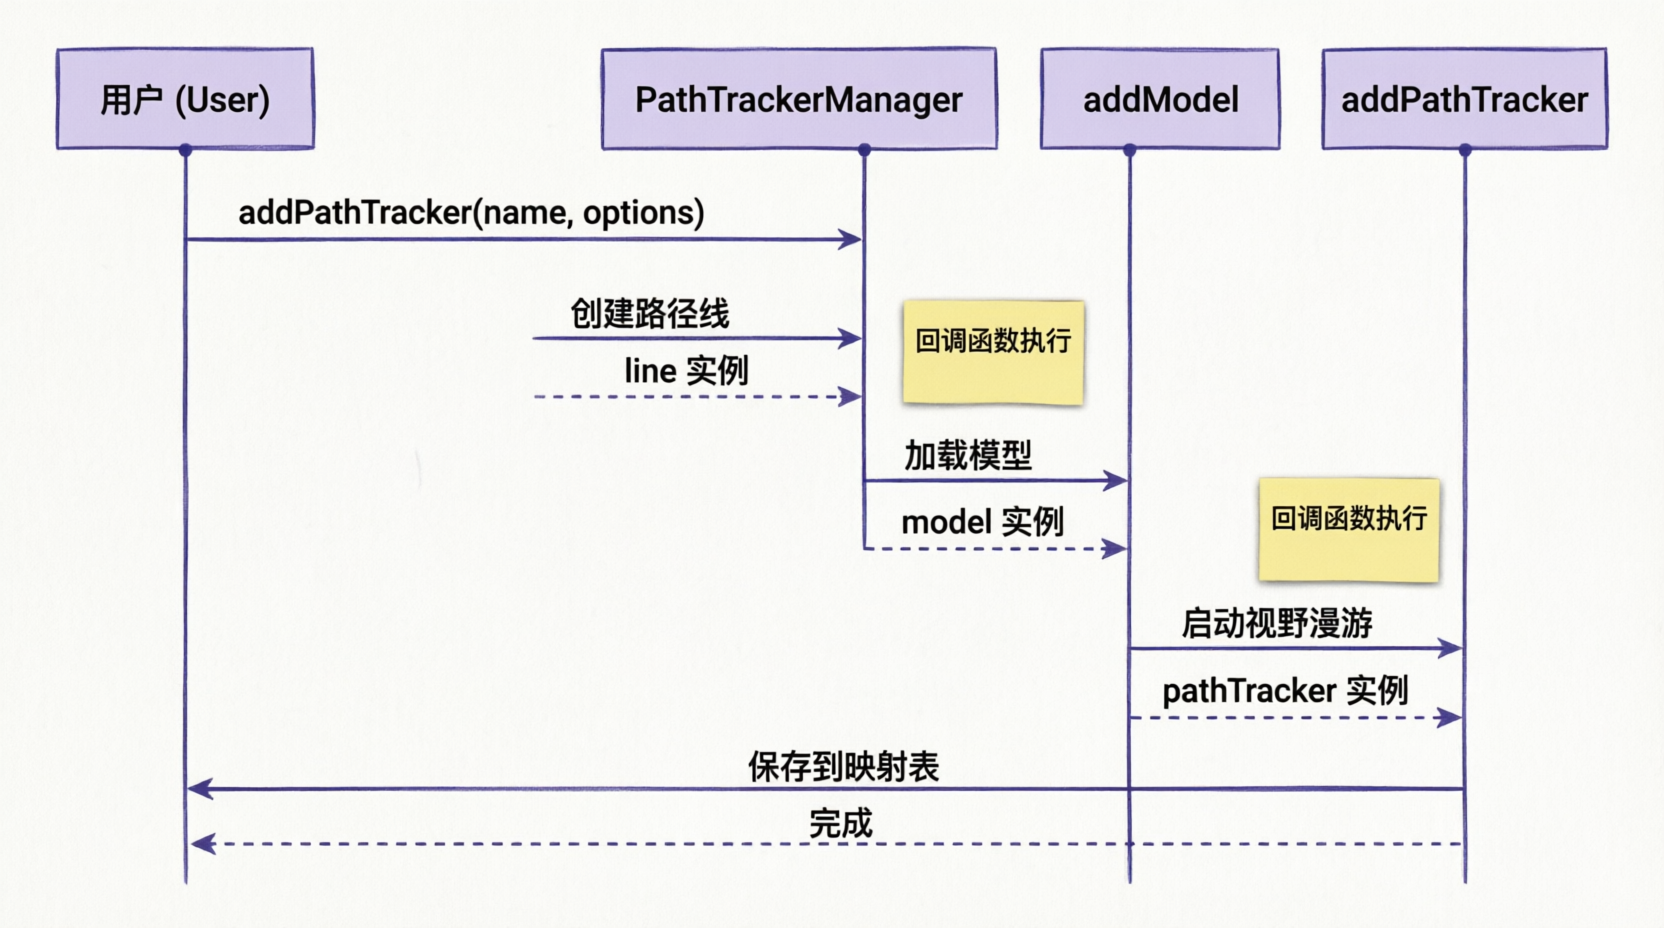
组件构成
视野漫游动画由三部分组成:
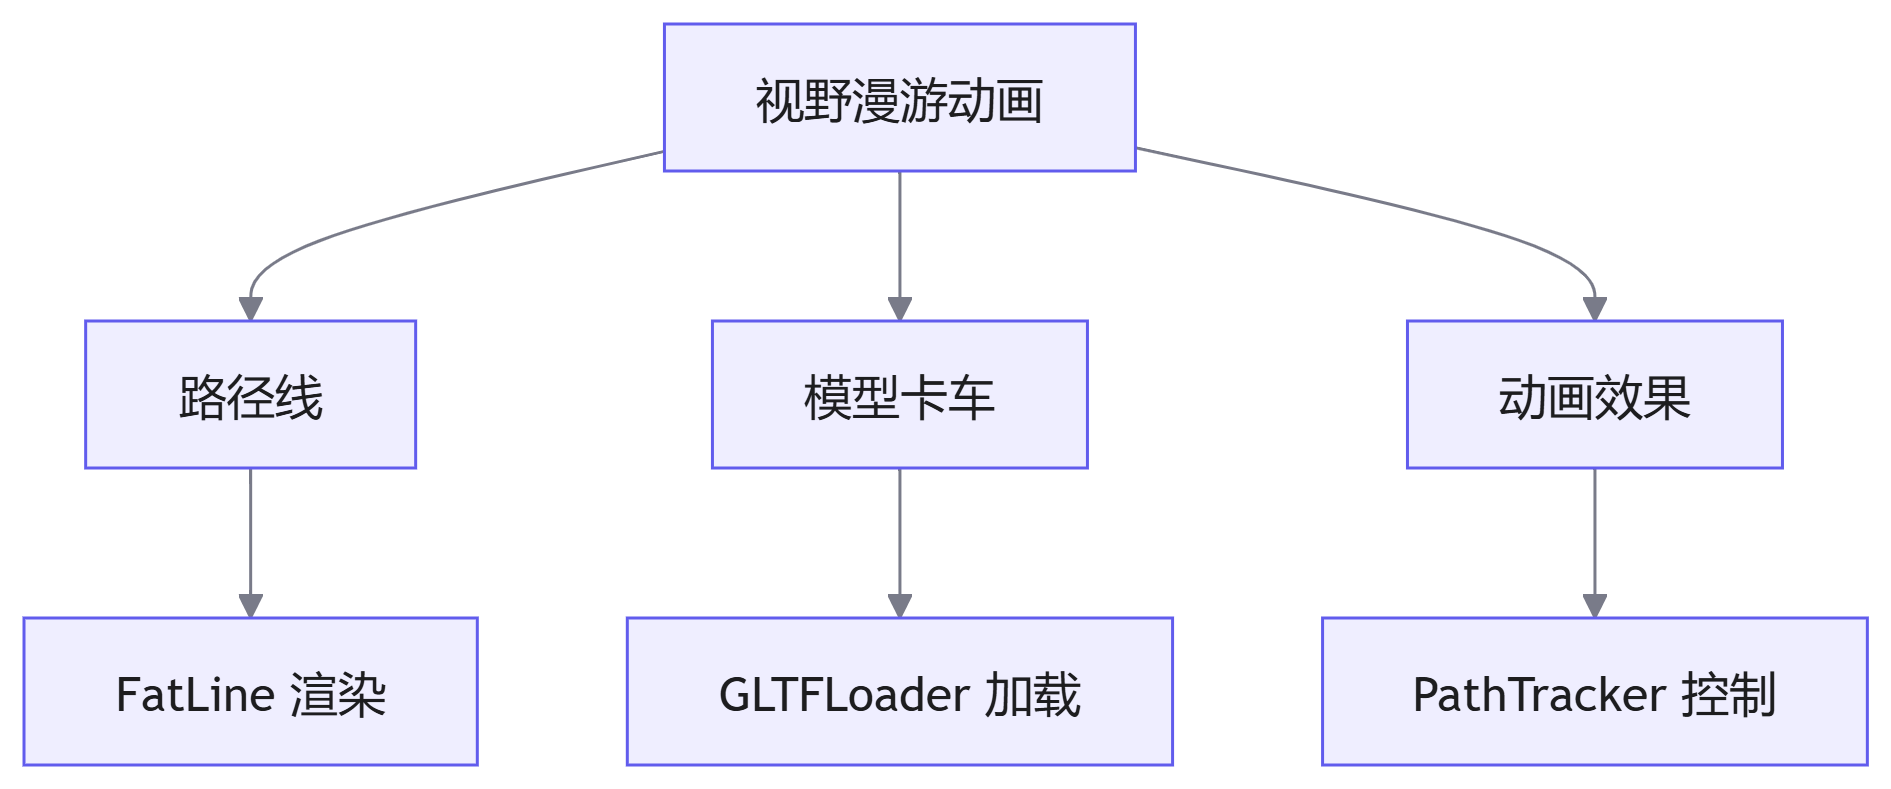
PathTrackerManager 实现
javascript
import {
  addPathTracker,
  addLine,
  addModel,
  removePathTracker,
  removeModel,
  removeLine,
} from '../xxx.js'

/**
 * 视野漫游动画管理类
 */
class PathTrackerManager {
  constructor(engine) {
    this.pathTrackerMap = new Map()
    this.engine = engine
  }

  /**
   * 添加视野漫游动画
   * @param {String} name - 动画名称(唯一标识)
   * @param {Object} options - 配置选项
   */
  addPathTracker(name, options) {
    // 如果已存在,先删除
    if (this.pathTrackerMap.has(name)) {
      this.removePathTrackerByName(name)
    }

    const { position, positions } = options || {}

    // 1. 添加路径线
    let { line } = addLine(
      positions,
      {
        lineWidth: 15,
        color: '#d0a63c',
        opacity: 1,
      },
      null,
      (geoData) => {
        // 2. 线加载完成后,添加模型
        addModel('maplayer/assets/models/kache.glb', position, 150, (model) => {
          // 3. 模型加载完成后,启动视野漫游动画
          addPathTracker({
            positions: geoData,
            position,
            model,
          })

          // 4. 保存到映射表
          this.pathTrackerMap.set(name, {
            line: line,
            model: model,
          })
        })
      },
    )
  }

  /**
   * 根据名称删除视野漫游动画
   * @param {String} name - 动画名称
   */
  removePathTrackerByName(name) {
    const pathTracker = this.pathTrackerMap.get(name)

    if (!pathTracker) return

    // 删除模型
    removeModel(pathTracker.model, this.engine)

    // 删除线
    removeLine(pathTracker.line, this.engine)

    // 从映射表删除
    this.pathTrackerMap.delete(name)
  }

  /**
   * 清空所有视野漫游动画
   */
  clear() {
    ;[...this.pathTrackerMap.keys()].forEach((pathTracker) => {
      this.removePathTrackerByName(pathTracker)
    })
    this.pathTrackerMap.clear()
  }
}

export { PathTrackerManager }使用示例
javascript
// 1. 创建管理器实例
const pathTrackerManager = new PathTrackerManager(engine.value)

// 2. 准备路径数据
const positions = [
  [116.404, 39.915],
  [116.405, 39.916],
  [116.406, 39.917],
  [116.407, 39.918],
]

// 3. 添加视野漫游动画
pathTrackerManager.addPathTracker('route-1', {
  position: [116.404, 39.915], // 模型起始位置
  positions: positions, // 路径坐标数组
})

// 4. 删除指定动画
pathTrackerManager.removePathTrackerByName('route-1')

// 5. 清空所有动画
pathTrackerManager.clear()执行流程图
贡献者
 duyidao 刀刀